Google Workspace (Gsuite)
All faculty, staff, and students use Google Apps for Education for email as well as calendaring, Docs, and Drive.
For additional support needs, visit support.google.com.
- Gmail Articles
- E-Mail Attachment Limits
- How to Obtain Headers from Email
- I am being redirected when I try to log into my CAA Gmail account
- Sending Mail from a Different Address in Gmail
- Google Drive Articles
- Phishing Attempt Practices
- Setting up 2- Step Verification(2SV) for your Google Account
Gmail Articles
Overview
Gmail is Google's email service. Gmail is managed via Google's commercial email servers and can be checked in real-time on the web. Access to Gmail is available to current faculty, staff, students. Gmail smart features include:
- Integration of Google Chat, Meet, Calendar, and other Google Workspace products
- The ability to create and manage spaces for ongoing and long-term conversations
- Utilization of writing and intelligent search suggestions
Access
To access Gmail on the web, navigate to gmail.google.com
Note: If you are logged into a personal Google account in the same browser, you may be redirected to the inbox for that account. See this Help Document to add a second account to your browser session.
To access Gmail from a mobile device, download the Gmail app from the App Store (iOS devices) or the Play Store (Android devices).
Note: App State recommends using the official Google Gmail app rather than third-party mail apps such as Apple Mail.
Help
For tailored assistance with Gmail, contact the Help Desk at helpdesk@cornerstonephiladelphia.com.
For general assistance, visit Google's Gmail Support Page.
E-Mail Attachment Limits
Attachment Size Limit
You can send messages up to 25 MB in size. You may not be able to send attachments larger than 25 MB to contacts who use other email services that have smaller attachment limits. If you'd like to send attachments that are larger than this, you can insert them from GoogleDrive.
Note: As a security measure to prevent potential viruses, Gmail doesn't allow you to send or receive executable files (such as files ending in .exe).
Sending Attachments Larger than 25MB using Google Drive
Gmail's attachment limit is 25MB, but you can insert files larger than 25MB using Google Drive:
- At the bottom of the email you're writing, click the Google Drive icon
 to insert files from Drive.
 - In the “Insert files using Google Drive” menu, you can upload a file to Google Drive from your device or navigate to a file you've stored in Drive. To send a file already stored in your drive, click on the file you want to attach.
- Choose the option to insert as either a Drive link (a link to your original file) or as an attachment (a copy of your file)
- Click insert to “insert”.
You can also do this on the Android Gmail app by selecting Insert from Drive from the 3-dots menu. Gmail then adds a link to your message so recipients can click the link to view your file.
Other Attachment Size Limits
Messages sent using Google Groups (replaced listserv system):
To view Google Groups policies and limits, see this help document: Understanding Groups policies and limits
How to Obtain Headers from Email
Below are step-by-step instructions for displaying email header information within several email apps.
Gmail
- In Gmail, click on the email you would like to view headers for.
- Click the three-dot
 icon next to the Reply button.
 - Select Show Original.

Mac Mail
- Open the email.
- Click on the View menu on the Menu Bar.
- Select Message, then Long Headers.

Outlook 2011
- Right-click on the email that you would like to view the headers for (or use Shift +Click)
- Click View Source.
- This will open a text file with the Header Information outlook source code.
Outlook 2010
- Open the email.
- Click the File Tab.
- Select Properties.
- The information will be listed under the Internet Headers section out look properties.
Outlook 2007
- Right-click the email (or use Shift + Click).
- Choose Message from the menu.
- The information will be listed under the Internet Headers Section outlook message options.
Thunderbird
- Select the email.
- Click on View.
- Click on Headers.
- Click on All.
- Click the “Forward” button and all header information will appear at the top of the email.
I am being redirected when I try to log into my CAA Gmail account
If Google redirects you to your CCA log-in or inbox when you try to log into your personal account OR if Google redirects you to your personal account when you try to log in to your CCA account your browser history is causing this issue. Clearing the history will fix the issue but this solution is temporary because the browser history will save the page/site and cause the same problem in the future.
Internet history, also known as browser history, is a tool or resource in a Web browser that keeps track of sites and pages that a user visits. Through tabulating URLs, Internet history facilitates a quick reference or lookup of previously visited pages.
The best solution to this problem is to add a second account:
- Log into your CCA account (Log out of your personal account first if you are logged into it.)
- Click the Google Apps icon in the upper right-hand corner.
- Click Add another account.
- Log in with the email address and password of your personal account.
To switch back and forth between these two accounts, click on the Google Apps icon in the upper right-hand corner and choose the account you want to view from the list.
Sending Mail from a Different Address in Gmail
This guide will show you how to set up the ability to send mail from a different address in your Gmail account.
When sending mail from an alternate email address (e.g., google@cornerstonephiladelphia.com), the sent mail only appears in the sending account and NOT in the alternate email account. For example, if user@cornerstonephiladelphia.com can send mail as google@cornerstonephiladelphia.com, the sent mail only appears in user@cornerstonephiladelphia.com and not google@cornerstonephiladelphia.com.
For more information, navigate to the Google Support Send emails from a different address or alias page.
How to Grant Someone "Send As" Access
You can send mail from an alternate account when you are within your account by setting up the Send Mail As feature:
- Sign in to your Gmail account.
- Click the
in the upper-right and select Settings and the Accounts and Import tab.
- Under "Send mail as", click Add another email address you own.
-
In the Email address field, enter the name and alternate email address of the account you want to send from. Do not select “treat as an alias”.
-
Click Next Step >> and then click Send Verification. Gmail will send a verification message to the other email address to confirm that you should be able to send mail to it.
-
Locate the message from Gmail. Open it and either click the link contained in the message or enter the confirmation code in the Accounts section of your Google Apps email settings.
Note: You can also set up delegated access to an alternate account by following the guide here: Setting up Mail Delegation in Gmail.
How to Revoke "Send As" Access
IMPORTANT: if you want the ability to revoke "send as" access, you will need to keep the verification message. There are 2 ways to revoke or terminate the ability to send as another account:
- From the account that uses the Send Mail As feature: Go to Gmail Settings, select the Accounts and Import tab, then click on the delete link next to the account in the Send Mail As section.
- From the account that granted access to the other account: Go to the email that confirmed Send Mail As and scroll to the bottom to cancel the verification.
Google Drive Articles
Overview
Drive is a cloud-based file storage and sharing system with built-in tools for word processing (Google Docs), spreadsheet creation (Google Sheets), slideshow creation (Google Slides), and other collaboration and productivity applications. Through our Google Workspace (formerly G Suite) licensing, every CCA faculty, staff, student, storage space in Drive. Users can share files and collaborate with other Drive users.
Access
On the web, access Drive by navigating to https://drive.google.com/a/appstate.edu.
Note: If you are logged into a personal Google account in the same browser, you may be redirected to the inbox for that account. See this Help Document to add a second account to your browser session.
On a mobile device, access Drive via Google's Drive app, which is available for free in the App Store (iOS devices) or Play Store (Android devices)
Note: CCA recommends using the official Google Drive app rather than third-party mail apps such as Apple Mail.
Help
For general assistance, please view Google's Support Page.
Google Shared Drives
What can you do with Shared Drives?
Unlike files in My Drive, files in a Shared Drive belong to the team instead of an individual. Even if members leave, the files stay exactly where they are so your team can continue to share information and get work done.
Not sure whether to use My Drive or Shared Drives?
Ask yourself these questions:
- Are the files of interest to most or all members of a particular project shared?
- Do the files share a consistent theme?
A "yes" to both questions means creating a new Shared Drive is a good idea. If the files and folders are for many different projects, create multiple Shared Drives.
More Information
For more on when to use Shared Drives, see this Guide for Best Practices
Phishing Attempt Practices
Phishing Attempt Practices
Filter Sender to Spam or Delete (Manual Control)
Note: This is for computer devices use only, not mobile devices.
1. Open an email from the sender

2. Click the 3 dots at the top of email you want to send to spam or trash and select Filter messages like these.
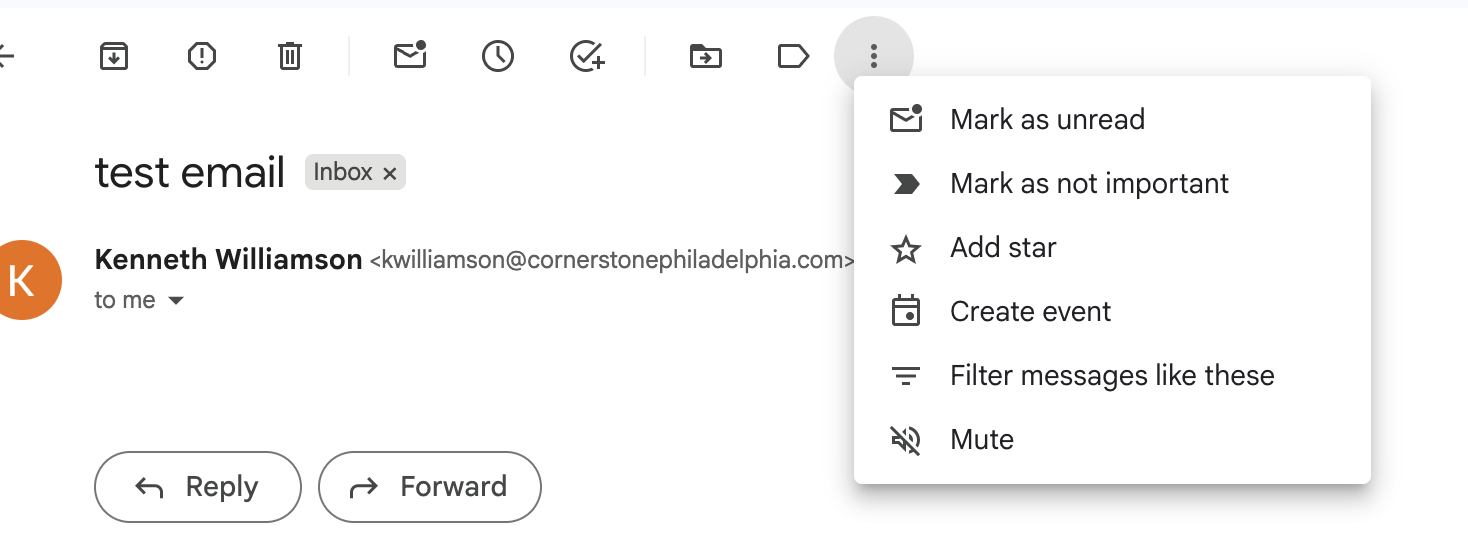
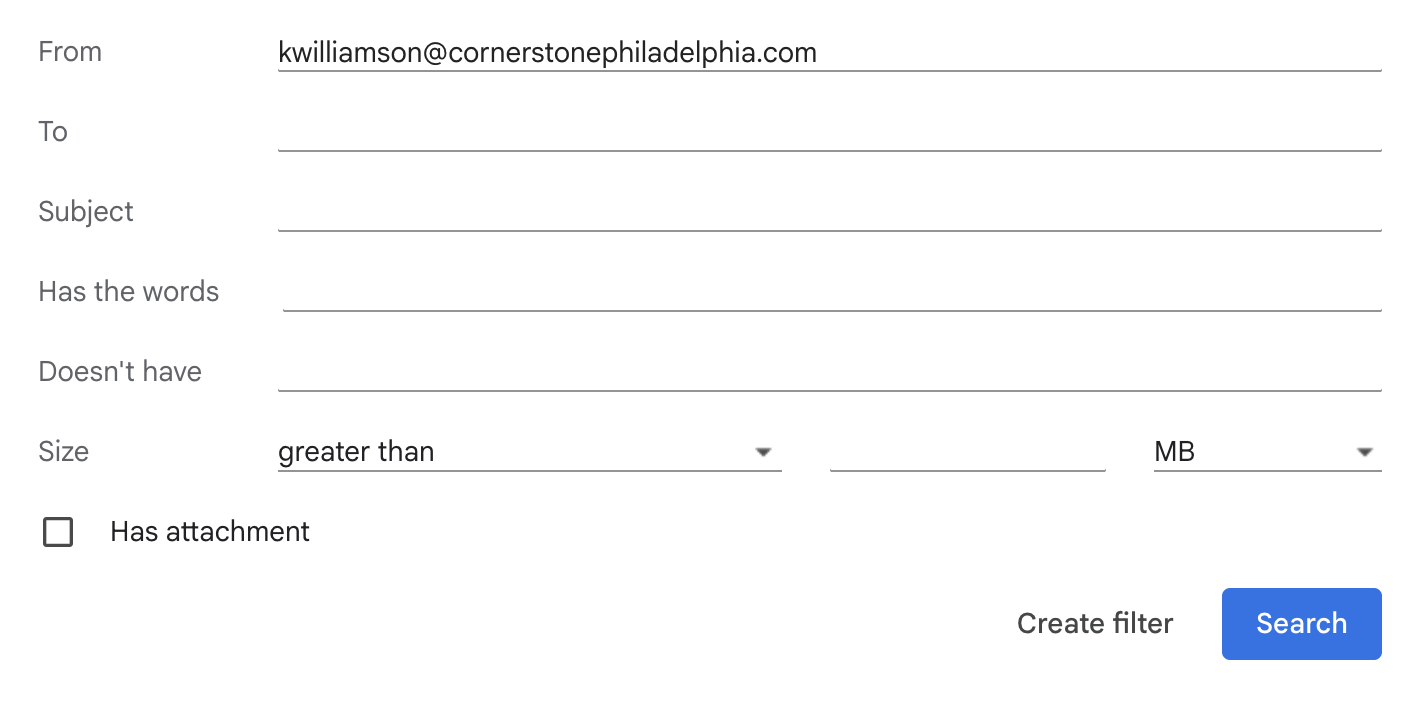
3. Once you are in "filter messages like these." You will see the senders email appear at the top. next click "Create filter."
4. In the "Create Filter" section. Select "Delete It" and optional choose if you have received more than one email from the same sender also choose "Also apply filter to matching conversations". Once you select your filter(s) click "Create Filter."
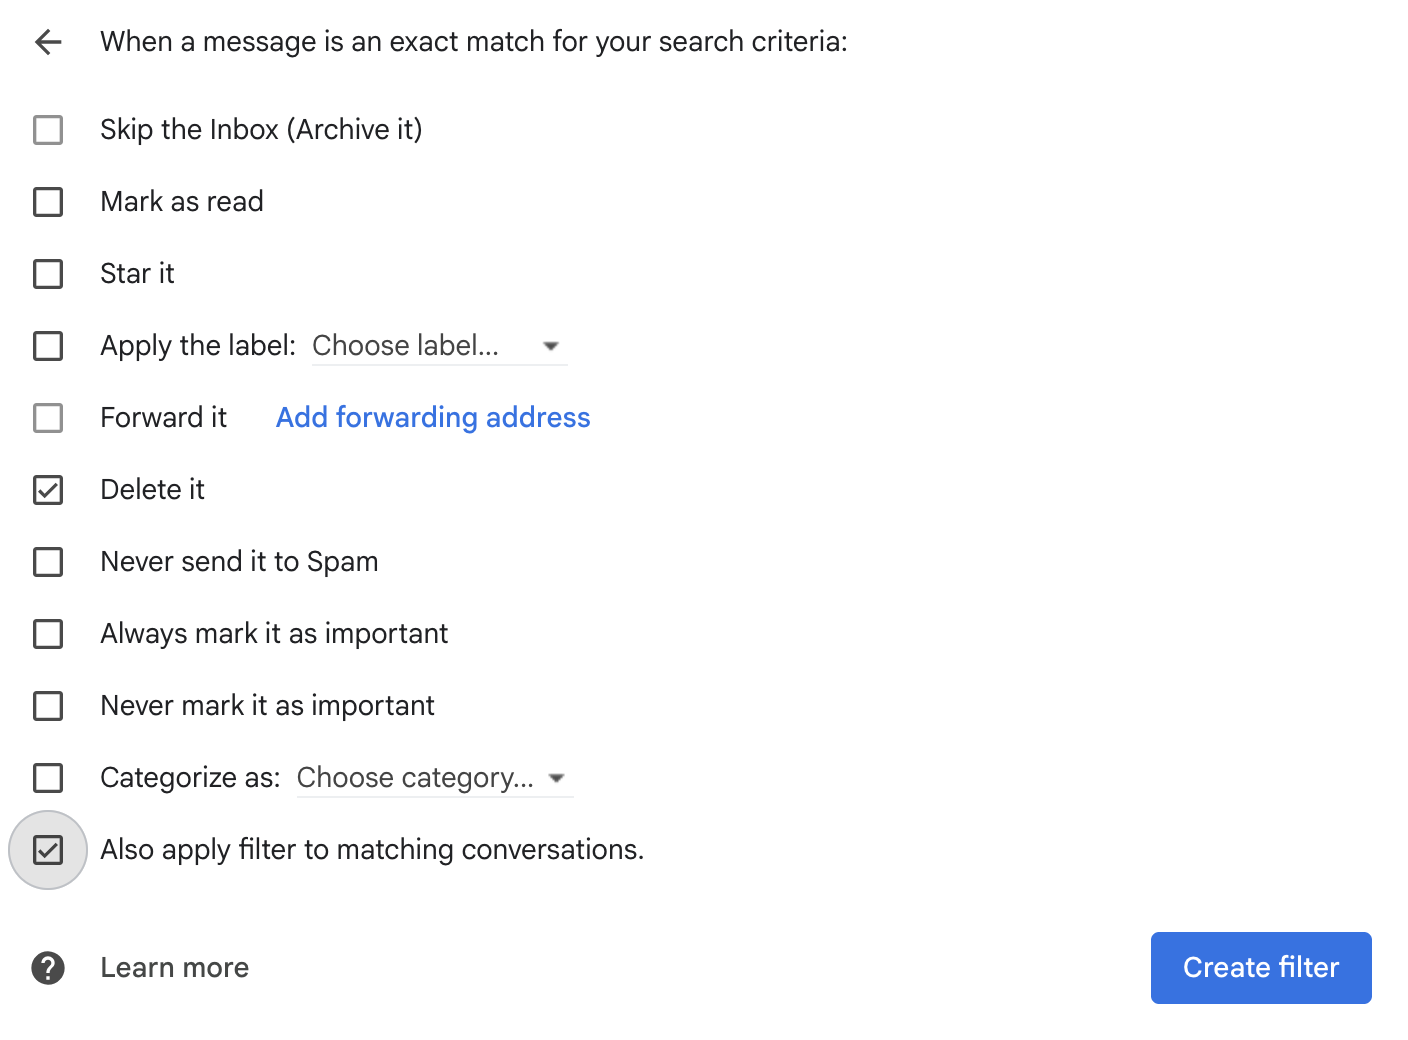
5. This will effectively blocks the sender by moving all future emails from your inbox straight to "Spam or Trash."
Setting up 2- Step Verification(2SV) for your Google Account
2-Step Verification Setup
-
Log into your google account. Once you are logged in go to the top right corner next to your initial(s) and click Account. Note: There are two logos once you sign in with your initial displaying. Click the one on the actual webpage and not the one displaying over top of "All Bookmarks"
2. Once you are in your account navigate to the menu on the left hand side of the screen and click on Security.
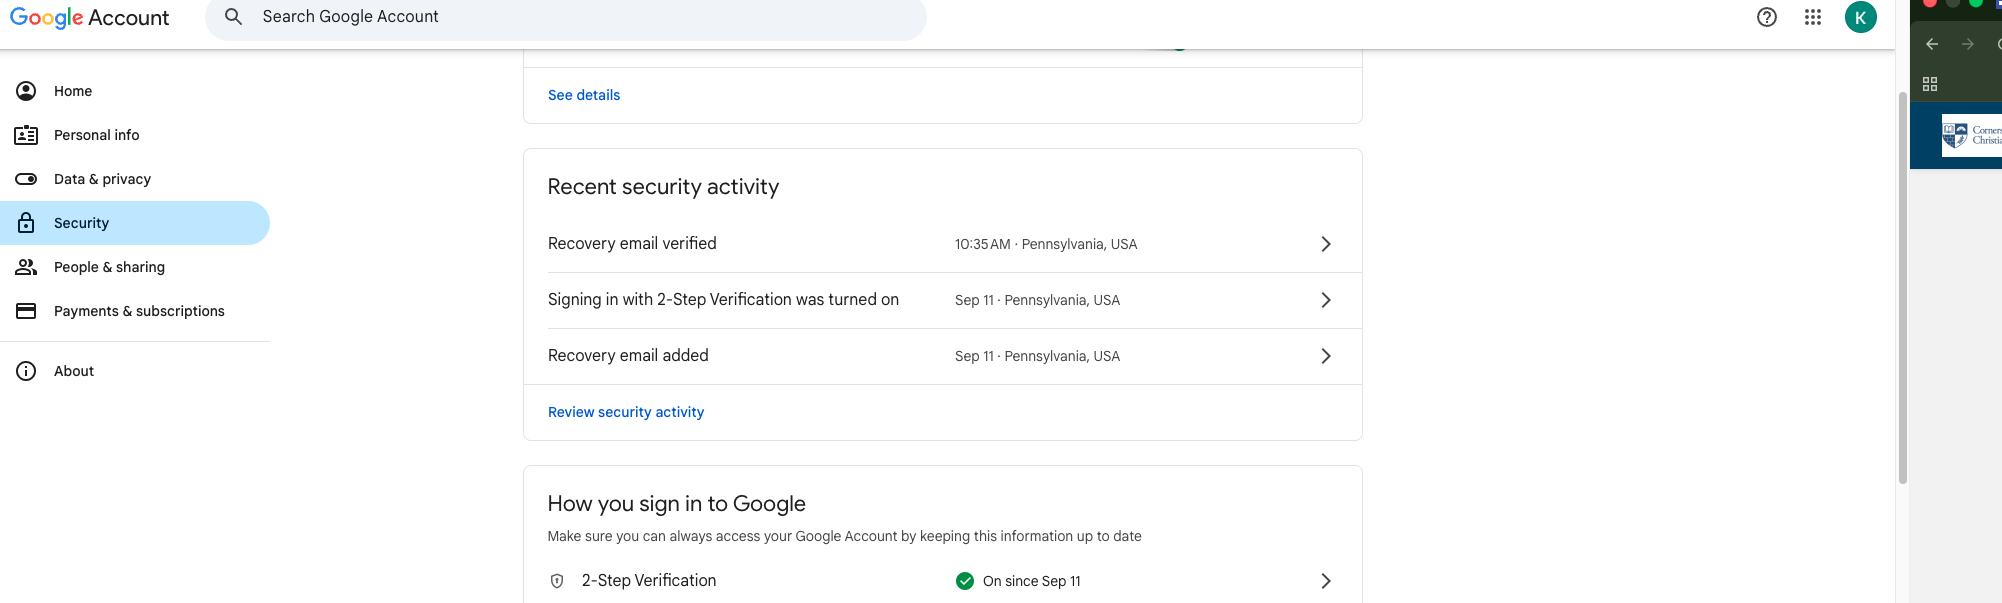
3. Once you are on the Security page scroll down to the bottom. You will see the setup for 2-Step Verification options under How you sign in to Google. Under how you sign in to Google, you have different Options on how you want to setup 2-Step Verification for yourself. You can choose one, or all like it is displayed in the screenshot below. You can also add More Options at the bottom of the screenshot as well if you choose too. For more security on your account. (Exp: Authenticator, BackUp 2-Step Verification, and Backup codes.)
