*\*\*\* All print jobs will be held in a secure queue until you release (print) them or delete them from the job list at an Printer. If not printed or manually deleted, they will be automatically deleted after 8 hours. \*\*\**
# How to Print- Part 2 (Staff Login Printer) ## Printer Sign in**There are 3 ways to login to the MFPs…**
##### **Click the arrows on the left side to display directions:**The first time you do this, you will be prompted to enter your **Username** (fist initial, last name. ex=jdoe) and **Password** ( related to your CCA Google Workspace Account )to associate the card with your cca-print account. After that, simply TAP and it will identify your account.
*\*\*\* The default settings for CCA print jobs are B/W and Double-sided. \*\*\**
# How to use the PaperCut Print system - Faculty and Staff- Full All new Toshiba multifunction printers (MFPs) will be streamlined to have the same buttons/functions. The image below is an example of the main login screen and button functions. 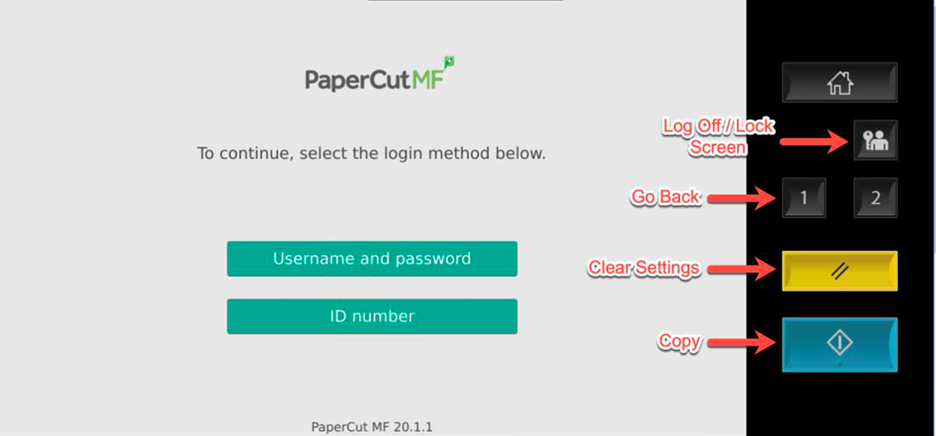 ## Printer Sign in**There are 3 ways to login to the MFPs…**
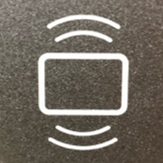
1. Tap your **ID card** on the MFP at the icon (shown below) to left of the touch panel*.*The first time you do this, you will be prompted to enter your **Username** (fist initial, last name. ex=jdoe) and **Password** to associate the card with your account. After that, simply TAP and it will identify your account.
 1. Type **ID number.** 2. Enter **Username** *(full email address)* and **Password** Once logged in, you have 3 options: 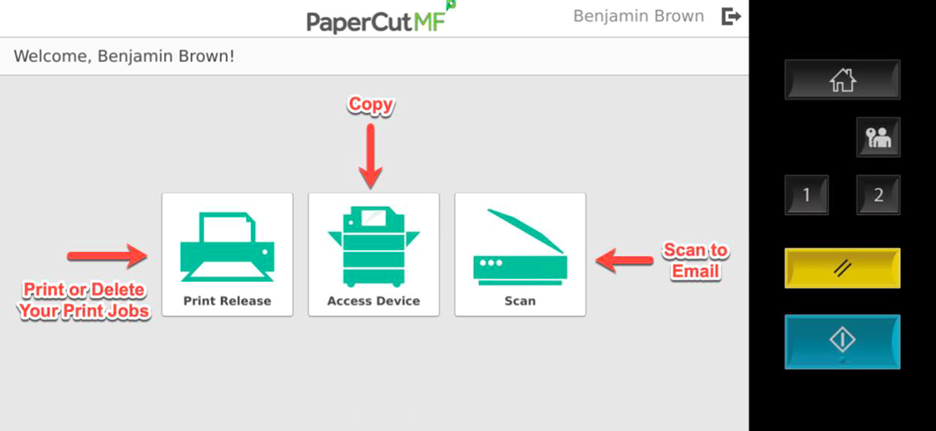 1. **Print** 2. **Copy** 3. **Scan** - to ***Email***, ***Fax***, or ***Google Drive*** The system will automatically log you off after 45 seconds of no activity. To manually log off, you can click the **Log Off / Lock Screen** or **Clear Settings** buttons *(see image above)*, or click the log out icon next to your name in the top section of the touch screen *(see image below)*. **How to Submit a Print Job** We will be deploying **PaperCut Print Deploy Client** to all school computers. Once the software is installed, it will automatically open its main window *(see below)*, prompting the user to sign-in. 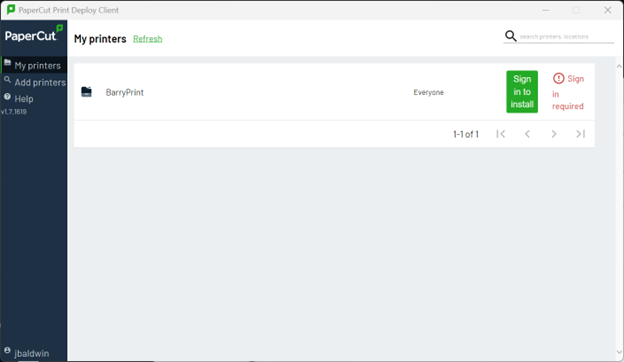 Once you sign-in, the new **FOLLOW-ME** print queue will be installed on the computer, and will appear in your printer list when you go to print. If you see the green **Sign In** button (as shown in the image above), do so to complete the installation. Use this print queue to send all print jobs to the new release print system.*\*\*\* All print jobs will be held in a secure queue until you release (print) them or delete them from the job list at an MFP. If not printed or manually deleted, they will be automatically deleted after 24 hours. \*\*\**
## Print Job Release **How to Release a Print Job** Login to an MFP *(see steps above)*. Once logged in, you’ll see the number of print jobs/pages in your queue at the top of the screen. You can select the **Print all** button to print them all with no changes. 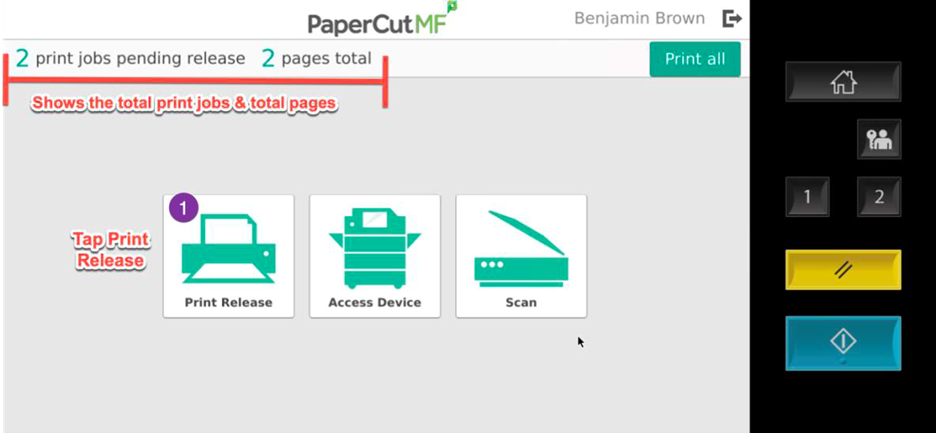 Or tap the **Print Release** button, to view the print job list. Here you can select the specific print job you want to print, and optionally change settings (# of copies, single/double-sided, etc) by tapping the ">" button to the right of the print job. 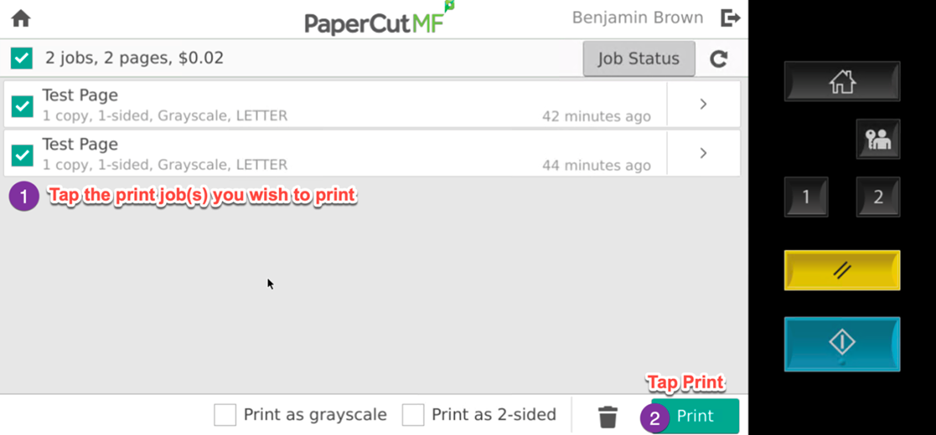 Select the desired job and tap **Print**. You can also manually delete a print job if desired *(before the 24-hour time limit)*.*\*\*\* The default settings for CCA print jobs are B/W and Double-sided. \*\*\**
## Making Copies Login to an MFP *(see steps above)* and tap the **Copy** button. The screen will change to the MFP's copy interface, showing choices for 1 or 2-sided, B/W or Color, # of copies, etc. Tap the Copy physical button to start the copy, or you can tap the **1** button to go back *(see example image below)*. 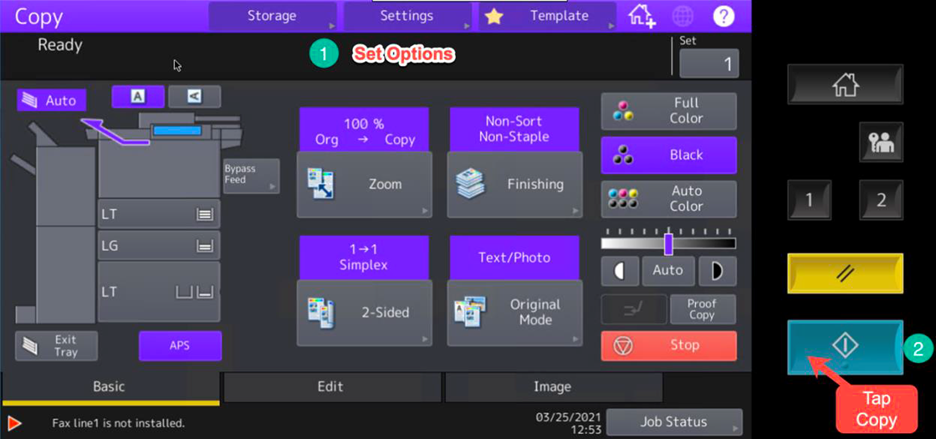 **Scan to Email/Other email** When you select **Scan to Email**, your CCA email is automatically used as the source for the scanned email. You can change the **Filename** for the scanned file or change DPI and other settings *(these are all optional)*. Then load the paper to scan and tap **Start**. When prompted you can load additional paper or simply tap **Finish** to completed the scan and send the email. The scanned page(s) will come into your CCA email inbox, with your CCA email as the sender. If you don’t see the email in your inbox, check your Junk folder. **Scan to Other Email** works the same way, except you must fill in the **Email** field for the email you want to send the scans to. # How to Make Copies Login to an printer *(see this [page](https://wiki.wearecornerstone.com/books/papercut-user-follow-me-printing/page/how-to-print-part-2-staff-login-printer "How to use the PaperCut Print system - Faculty and Staff- Full"))* and tap the **Copy** button. The screen will change to the MFP's (Multi Function Printer) copy interface, showing choices for 1 or 2-sided, B/W or Color, # of copies, etc. Tap the Copy physical button to start the copy, or you can tap the **1** button to go back *(see example image below)*. [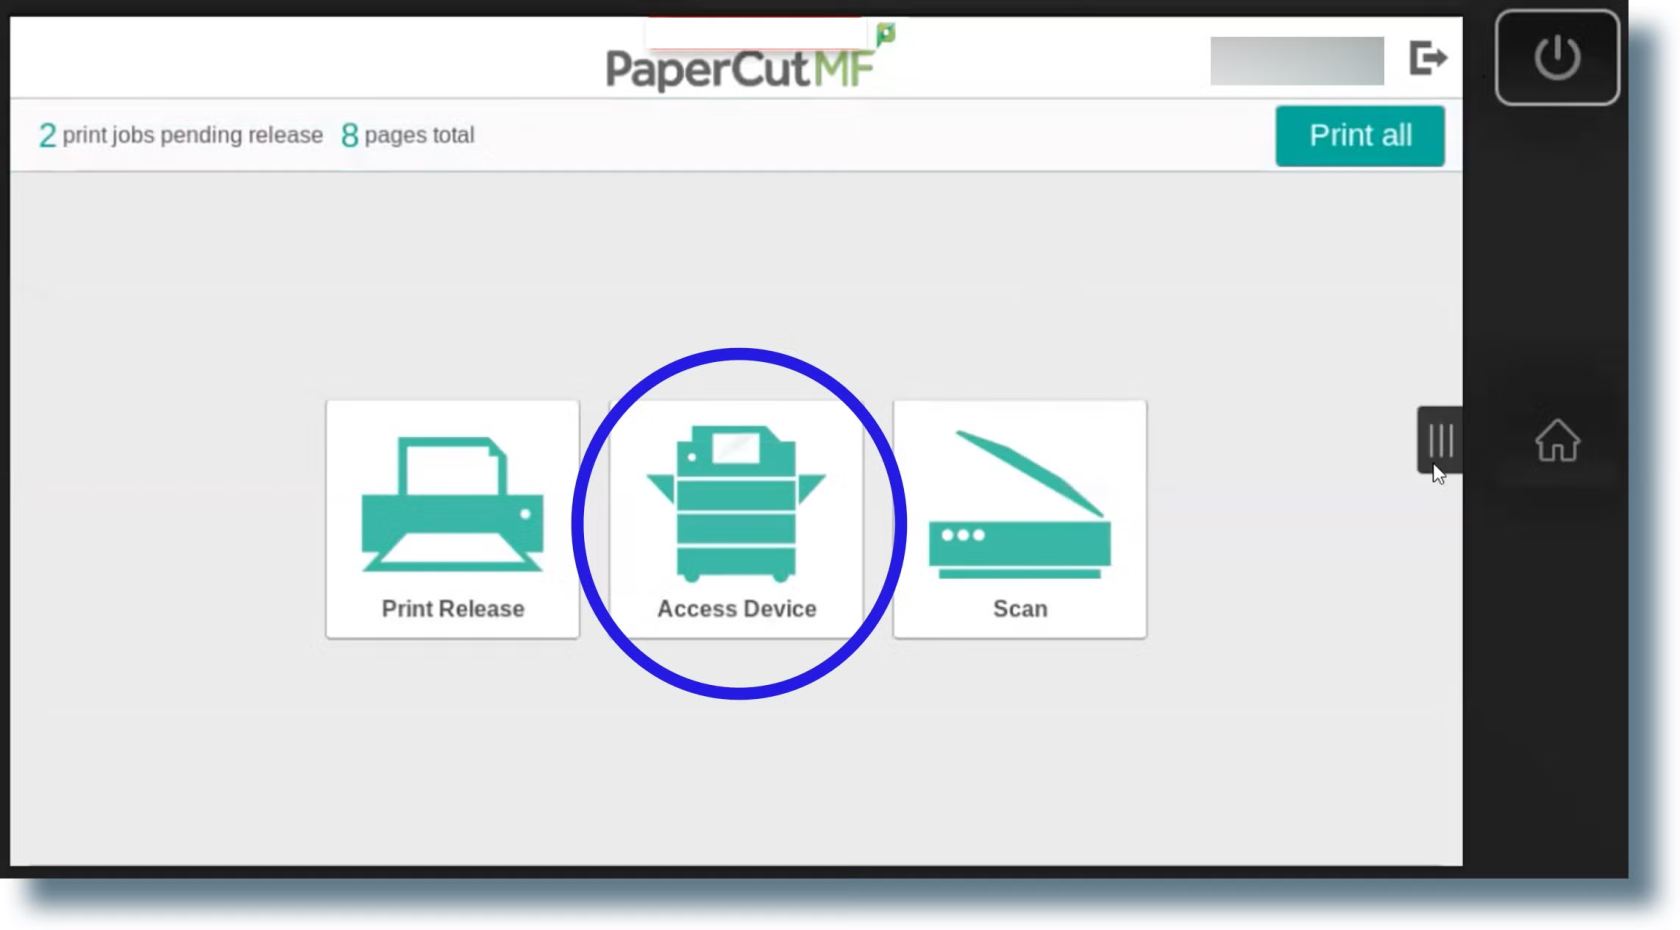](https://wiki.wearecornerstone.com/uploads/images/gallery/2025-09/gtbimage.png) # How to Scan Documents **Scan to Email/Other email** [](https://wiki.wearecornerstone.com/uploads/images/gallery/2025-09/YV3image.png) When you select **Scan to Email**, your CCA email is automatically used as the source for the scanned email. You can change the **Filename** for the scanned file or change DPI and other settings *(these are all optional)*. Then load the paper to scan and tap **Start**. When prompted you can load additional paper or simply tap **Finish** to completed the scan and send the email. The scanned page(s) will come into your CCA email inbox, with your CCA email as the sender.If you don’t see the email in your inbox, check your Junk folder.
**Scan to Other Email** works the same way, except you must fill in the **Email** field for the email you want to send the scans to. [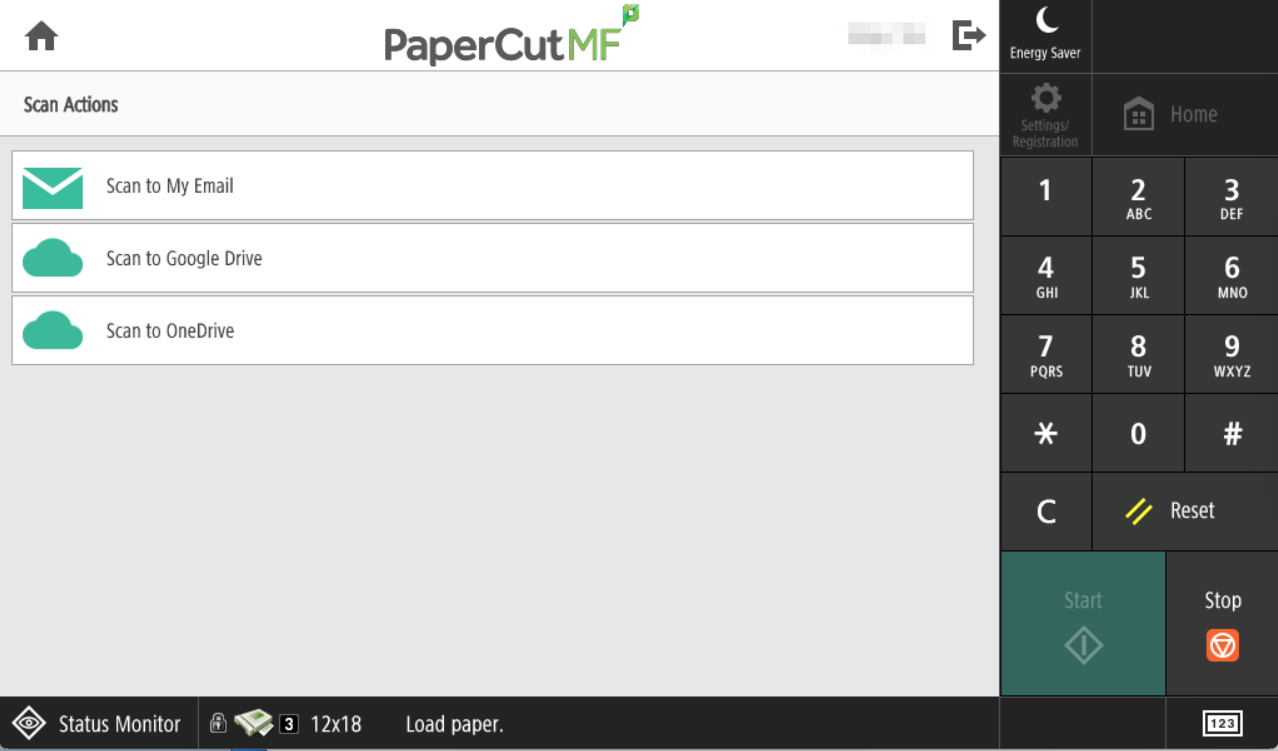](https://wiki.wearecornerstone.com/uploads/images/gallery/2025-09/bbjimage.png) # FOLLOW_ME Printing Troubleshooting Steps In this chapter you can find all troubleshooting steps for the FOLLOW\_ME printers. Please look over the steps provided. After performing the troubleshooting steps and you are not successful. Submit a ticket to helpdesk@cornerstonephiladelphia.com. # Steps to Release Print Jobs. This is a follow-up regarding the copiers. If you are experiencing printing issues, please try the steps below: **Important Note: Before releasing your print jobs, please double-check that they are not duplicates to avoid printing the same job multiple times.** 1. Open **System Settings** (you can also search for it; the icon looks like a gray gear[](https://wiki.wearecornerstone.com/uploads/images/gallery/2025-09/system-settings-icon.jpeg)).[](https://wiki.wearecornerstone.com/uploads/images/gallery/2025-09/open-system-settings-in-mac.jpg) 2. In **System Settings**, scroll down and select **Printers & Scanners**.[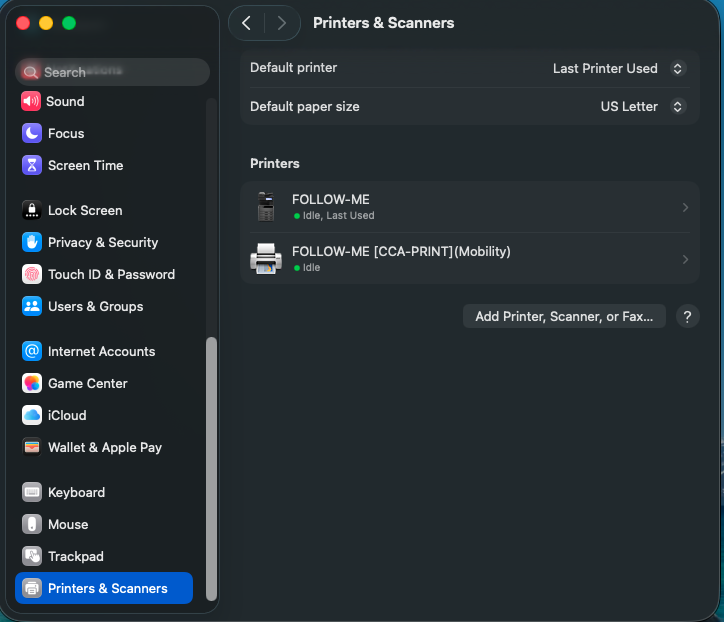](https://wiki.wearecornerstone.com/uploads/images/gallery/2025-09/screenshot-2025-09-29-at-9-47-35-am.png) 3. Select the **Follow Me** printer. 4. Click **Printer Queue**. 5. [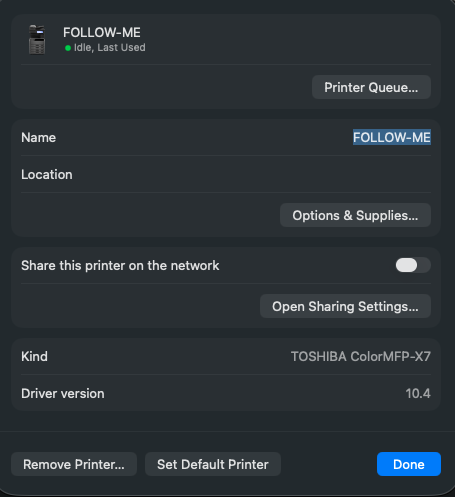](https://wiki.wearecornerstone.com/uploads/images/gallery/2025-09/screenshot-2025-09-29-at-9-48-12-am.png) 6. In the Printer Queue window: - Click the **Play button** in the top-right corner (above your print jobs). - [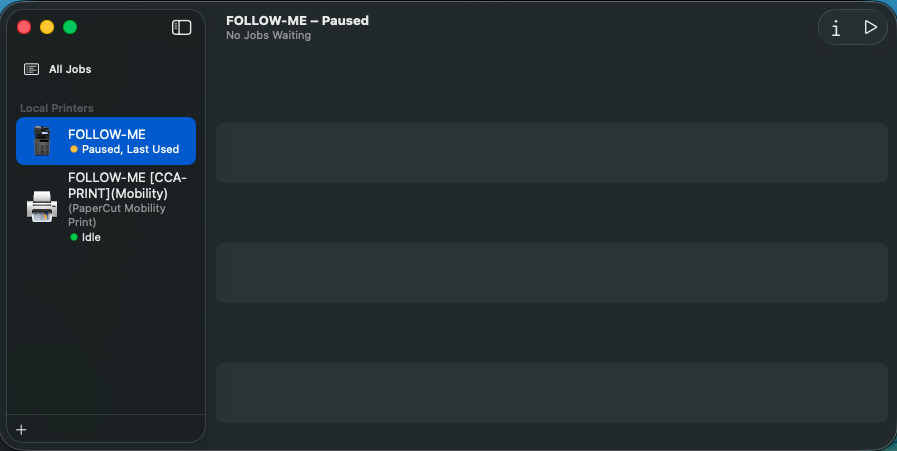](https://wiki.wearecornerstone.com/uploads/images/gallery/2025-09/screenshot-2025-09-29-at-9-48-31-am.png) - The Play button will switch to a **Pause button** once it’s active. - [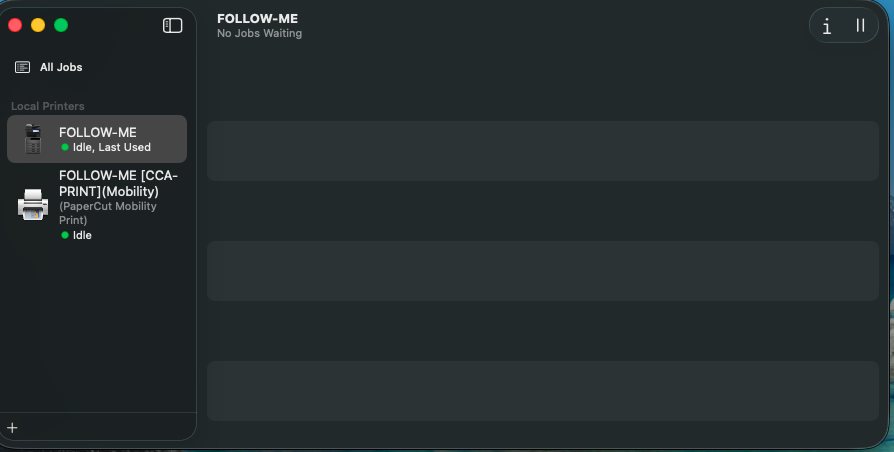](https://wiki.wearecornerstone.com/uploads/images/gallery/2025-09/screenshot-2025-09-29-at-10-05-48-am.png) - Then, release your print jobs by clicking the **Play button** next to each print job that you want released. If you do not want the print jobs just click the "x" next to the print job. - **Important Note: Before releasing your print jobs, please double-check that they are not duplicates to avoid printing the same job multiple times.** Once your jobs go through, you will be able to print normally. **Note\* If it asks you for administrator credentials to unpause the printer. Please submit a ticket to helpdesk@cornerstonephiladelphia.com** # How to Navigate to CoreFax/XMedius # Navigating to CoreFax/XMedius 1. Log into the print using your badge, account credentials, and/or your ID pin number.[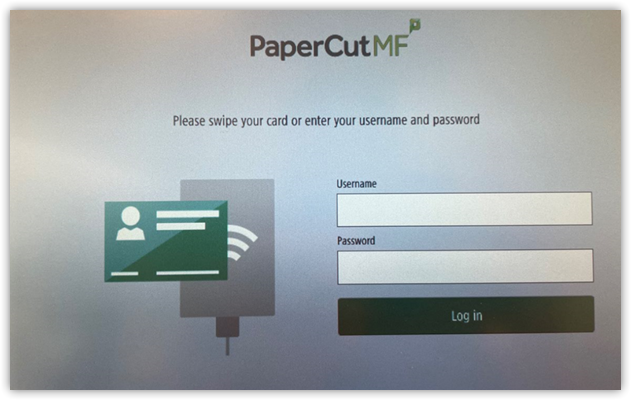](https://wiki.wearecornerstone.com/uploads/images/gallery/2025-11/papercut.png) 2\. Click on **"Access Device."** [](https://wiki.wearecornerstone.com/uploads/images/gallery/2025-11/iWbimg-0821.jpg) 3\. Click the **"Home Icon"** on the printer itself. [](https://wiki.wearecornerstone.com/uploads/images/gallery/2025-11/haMimg-0822.jpg) 4\. Click on **"OT XMediusFax"** [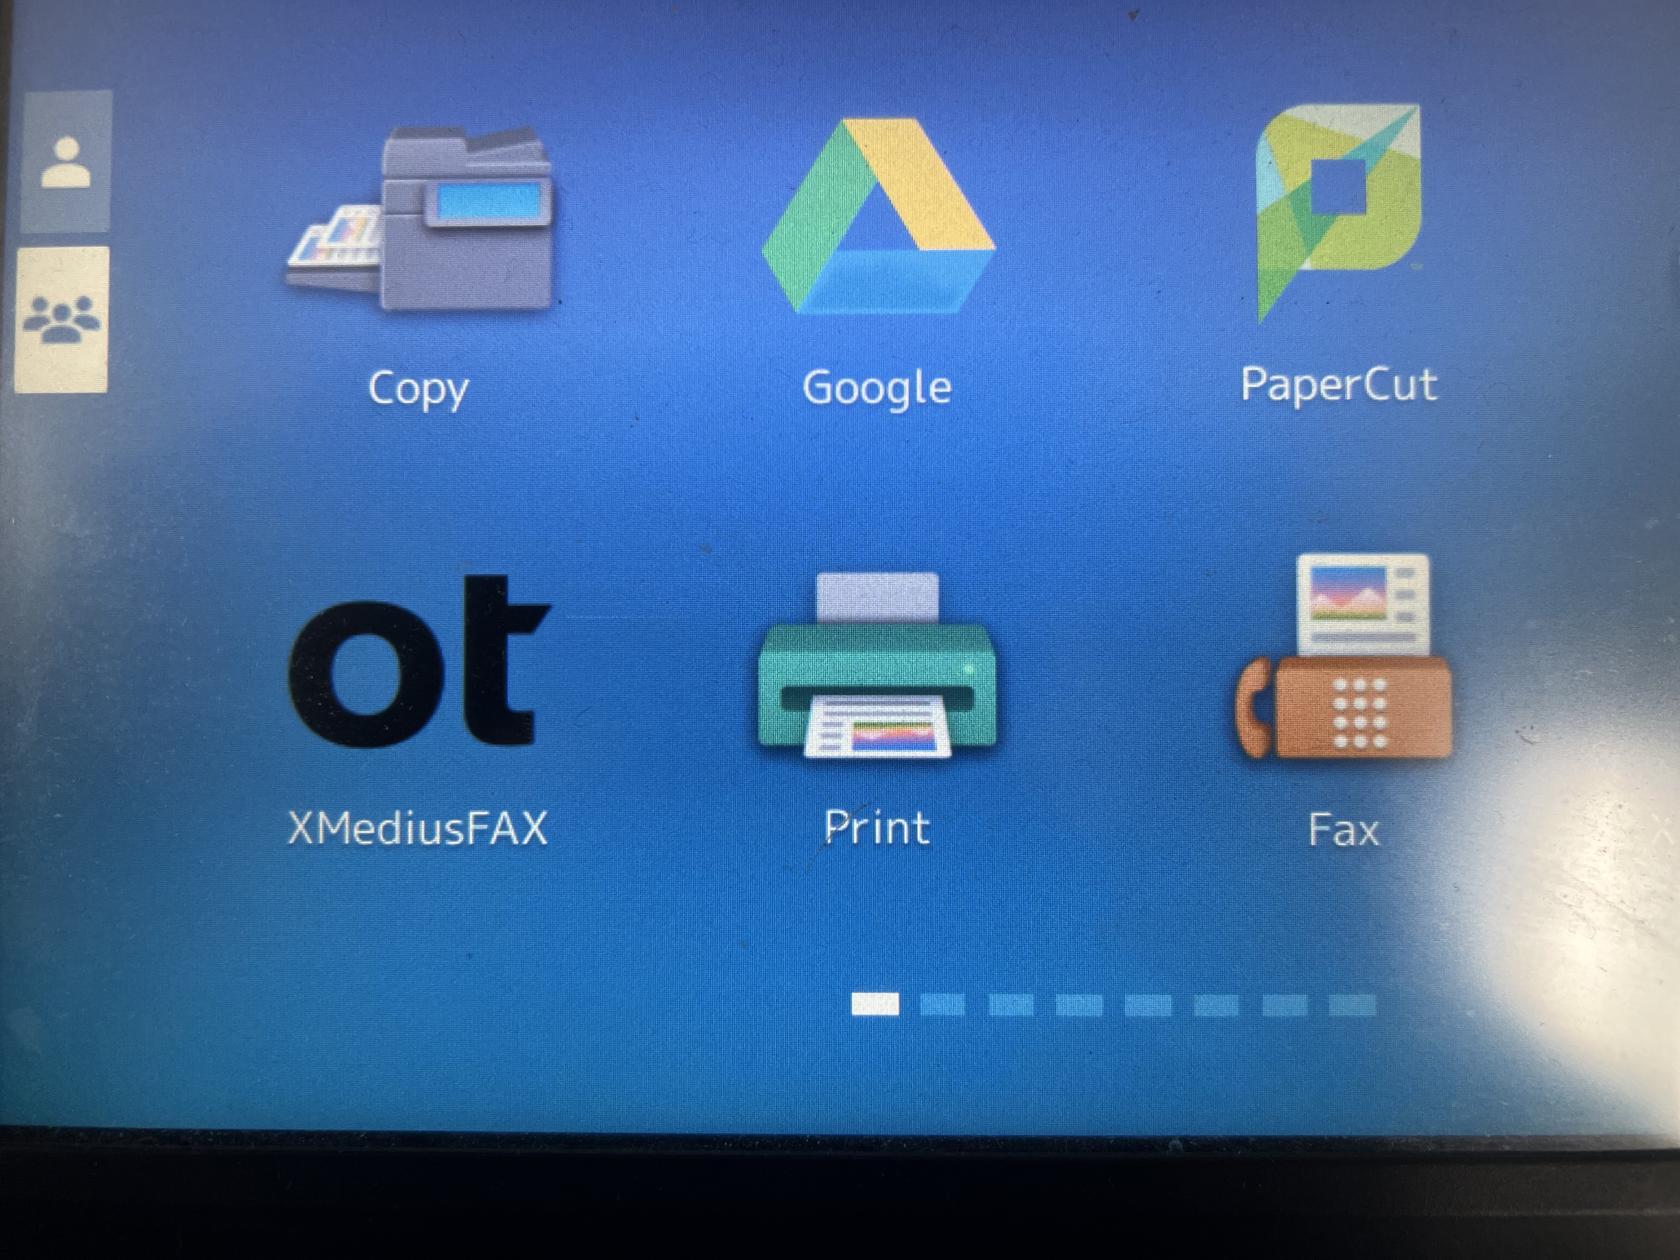](https://wiki.wearecornerstone.com/uploads/images/gallery/2025-11/IkKimg-0823.jpg) 5\. Once you are in **OT XMediusFax** the user screen will look like the image below. Where it says **"Fax"** that is where you can put the fax number in of the recipient you would like to send a fax too. Once you input the fax number the "**Scan"** button in the top right corner of the picture will enable. [](https://wiki.wearecornerstone.com/uploads/images/gallery/2025-11/2bgimg-0824.jpg)